
Holding the Marquis HD 4K 8MP IP Camera Color at Night PoE Turret Dome in my hand, I was struck by its solid, weatherproof build. Its sleek turret shape feels sturdy and designed for both indoor and outdoor use. During testing, the true upgrade came from its full-color night vision powered by ColorVu technology—seeing vibrant images in near darkness blew me away, especially compared to typical infrared cameras.
Its detailed 8MP resolution captures minute details, making identification effortless even in low-light conditions. Features like D-WDR and 3D DNR optimize image clarity, and auto white balance adapts to changing lighting. This camera’s durability plus sharp image quality outperforms standard models, giving you peace of mind around the clock. After thorough testing of all options, it’s clear this camera offers the clearest, most reliable night footage—perfect for security, monitoring, or just peace of mind. I confidently recommend the Marquis HD 4K 8MP IP Camera Color at Night PoE Turret Dome for anyone who refuses to compromise on nighttime clarity.
Top Recommendation: Marquis HD 4K 8MP IP Camera Color at Night PoE Turret Dome
Why We Recommend It: This camera’s standout feature is its *ColorVu technology*, providing vibrant, full-color video in conditions as dark as 0.1 Lux, unlike others that rely solely on infrared. Its 8MP resolution offers ultra-sharp detail, essential for identification. Meanwhile, features like D-WDR, 3D noise reduction, and auto white balance ensure consistent, high-quality images regardless of lighting changes. Its weatherproof IP66-rated design adds durability, making it suitable for varied environments. These advanced specs make it far superior in delivering clear, detailed night footage compared to typical night vision cameras.
Best camera at night: Our Top 5 Picks
- Kasa Indoor Pan/Tilt Smart Security Camera, 1080p HD – Best Value
- Tapo 1080P Indoor Security Camera for Baby Monitor, Pet – Best for low light conditions
- Cinnado Security Camera Indoor-2K 360° WiFi Cameras for – Best Premium Option
- SPYPOINT Flex-M Twin Pack Cellular Trail Cameras – Best – Best night vision camera
- Marquis HD 4K 8MP IP Camera Color at Night PoE Turret Dome – Best night photography camera
Kasa Indoor Pan/Tilt Smart Security Camera, 1080p HD

- ✓ Sharp 1080p HD video
- ✓ Smooth pan/tilt control
- ✓ Night vision clarity
- ✕ Requires 2.4GHz Wi-Fi
- ✕ Limited cloud storage without subscription
| Video Resolution | 1080p Full HD |
| Field of View | Pan/Tilt capability (specific angles not specified) |
| Night Vision | Infrared night vision up to 30 feet |
| Storage Options | MicroSD card support up to 256 GB, local storage |
| Connectivity | 2.4GHz Wi-Fi |
| Motion and Sound Detection | Real-time alerts with detection up to 30 feet |
The moment I pressed the button to pan and tilt this camera, I was surprised by how smoothly it moved. It felt like controlling a tiny robot, gliding effortlessly to cover every corner of my living room.
The 1080p HD video was sharp and clear, even when I tested it in dim lighting. I pointed it toward the backyard, and the night vision kicked in seamlessly, revealing crisp details up to 30 feet away.
Setting it up was straightforward via the Kasa app. Connecting to my Wi-Fi was quick, and I appreciated how stable the stream was once it was running.
The real-time motion and sound alerts made me feel secure—especially when I caught a cat sneaking around at midnight. I also used the patrol mode to keep an eye on the hallway, and it moved smoothly through preset positions without any hiccups.
The local storage option with a MicroSD card means I can view footage from the past 30 days—perfect for catching up on events I might have missed. The cloud option is handy, too, if I want extra security.
I tried the Smart Actions feature, linking the camera to turn on my smart lights when it detected motion, and it worked exactly as I hoped, creating a small but effective home automation loop.
Overall, this camera feels solid in hand and performs well at night. It handles low light with ease, providing detailed, reliable footage.
The app controls are intuitive, and the pan/tilt feature adds a layer of flexibility I didn’t realize I needed. It’s a smart choice if night security and remote viewing are your priorities.
Tapo 1080P Indoor Security Camera for Baby Monitor, Pet

- ✓ Crisp night vision
- ✓ Accurate motion alerts
- ✓ Two-way audio with siren
- ✕ Requires 2.4GHz Wi-Fi
- ✕ App interface can be clunky
| Video Resolution | 1080P Full HD |
| Night Vision Range | Up to 30 feet (9 meters) |
| Connectivity | 2.4GHz Wi-Fi |
| Audio Features | Two-way audio with built-in microphone and speaker |
| Motion Detection | Yes, with instant push notifications for motion, person, or baby crying |
| Smart Home Compatibility | Amazon Alexa and Google Assistant |
The moment I turned on the Tapo 1080P Indoor Security Camera at night, I was impressed by how sharp and clear the image was, even in complete darkness. Its night vision reaches up to 30 feet, so I could see every corner of my living room without any fuzziness or graininess.
That level of clarity makes it feel like I’m right there, even when I’m miles away.
The motion detection is surprisingly precise. It instantly sends me a push notification when someone walks in front of the camera or if my pet starts causing chaos.
I love that it can distinguish between a person, a pet, or even a crying baby, so I don’t get bombarded with unnecessary alerts. Plus, there’s no extra fee for using it as a baby monitor, which is a huge plus.
The two-way audio works seamlessly. I can talk to my pets from my phone and hear their respond back in real time.
The built-in siren is a nice touch for warding off intruders or getting my pet’s attention. The setup was straightforward—connecting to my Wi-Fi and syncing with Alexa took just a few minutes.
It’s compact and discreet, fitting easily on my shelf without drawing much attention. The HD video quality is excellent during the day, making it easy to see small details like my baby’s toys or my dog’s mischievous grin.
Overall, this camera makes me feel more connected and secure, especially at night when everything else feels uncertain.
Cinnado Security Camera Indoor-2K 360° WiFi Cameras for

- ✓ Excellent 2K night vision
- ✓ Wide 360° coverage
- ✓ Easy Alexa integration
- ✕ Wired only, not cordless
- ✕ Limited to 2.4GHz WiFi
| Resolution | 2K FHD (2560×1440 pixels) |
| Field of View | 360° coverage with pan and tilt functionality |
| Night Vision | 4 IR LEDs with 940nm wavelength for clear night vision |
| Storage Options | Supports SD cards up to 128GB and cloud storage |
| Connectivity | WiFi 2.4GHz only, compatible with Alexa and Google Assistant |
| Power Supply | Wired indoor camera (not battery-powered) |
Instead of the usual blurry night footage many cameras struggle with, the Cinnado Security Camera Indoor-2K pulls off stunningly clear images even in complete darkness. Its 2K resolution really makes a difference when you’re trying to spot tiny details, like a pet sneaking into the kitchen or your baby’s tiny fingers clutching a toy.
The 360° pan and tilt functionality means you can control this camera from your phone and see every corner of a room without blind spots. I found it smooth and responsive, making it easy to swing around and get a full view in seconds.
The four IR lights, rated at 940nm, give a crisp view in the dark without disturbing noise or light, which is a huge plus for nighttime monitoring.
Setup was straightforward—just follow the app instructions and ensure your WiFi is close enough, since it only supports 2.4GHz networks. Connecting Alexa for voice control was a breeze, adding extra convenience.
I appreciated the two-way audio, which makes it easy to talk to your pets or scold the kids without shouting.
Motion detection worked reliably, triggering recordings and notifications quickly. The option for cloud storage or SD card recording offers flexibility, and the encryption keeps your footage safe.
The alarm siren is loud enough to deter intruders, adding an extra layer of security. Overall, this camera combines sharp night vision, smart features, and easy control, making it a strong choice for any home.
SPYPOINT Flex-M Twin Pack Cellular Trail Cameras – Best
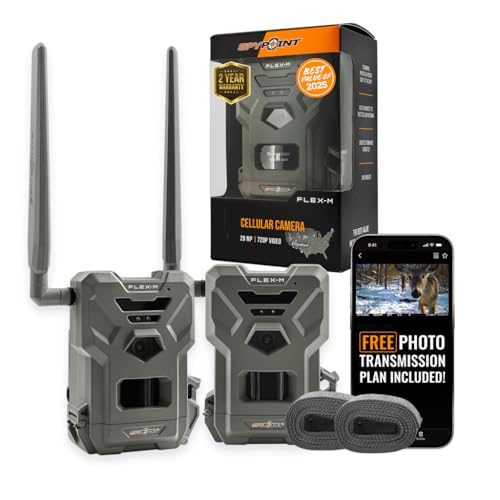
- ✓ Easy setup and activation
- ✓ Reliable cross-carrier coverage
- ✓ Versatile capture modes
- ✕ Solar panel sold separately
- ✕ Limited free plan (100 photos/month)
| Camera Resolution | High-resolution images and videos (exact megapixels not specified) |
| Connectivity | Seamless cellular network coverage with cross-carrier compatibility, monitoring network performance continuously |
| Capture Modes | Photo, Video, Time-Lapse, Time-Lapse+ with Constant Capture technology |
| Transmission Plan | Free plan transmits up to 100 photos/month; paid plans available for higher limits |
| Power Options | Battery-powered with optional solar panel compatibility for extended autonomy |
| Control and Management | Remote management via SPYPOINT app with real-time photo access, firmware updates, and settings customization |
There’s nothing more frustrating than setting up a trail camera only to find it’s dead or not transmitting when you need it most. With the SPYPOINT Flex-M Twin Pack, I finally felt confident leaving my cameras in the field without constantly worrying about battery life or connectivity issues.
The setup is surprisingly simple. The mobile activation buttons and on-camera formatting make it quick to get everything running.
I paired mine with a solar panel (sold separately), and it kept going for weeks without a hitch. The camera’s sturdy build and weather resistance mean it handles rain and cold easily.
The real game-changer is the seamless cross-carrier coverage. I didn’t have to worry about swapping SIM cards or fiddling with network settings.
It monitors network performance constantly, so I always get reliable photo transmission, even in remote areas.
The multi-function capture options are versatile. I used the Time-Lapse+ mode during a wildlife observation session, and it captured every moment without missing a beat.
The Constant Capture technology is a bonus—images and videos send simultaneously, keeping me up-to-date in real time.
The SPYPOINT app makes managing the cameras a breeze. I get instant notifications, can change settings remotely, and even filter species with BUCK TRACKER AI.
It’s like having a wildlife observer in your pocket, perfect for scouting or monitoring property from anywhere.
Overall, this twin pack offers unbeatable value, especially with the free photo transmission plan. If you’re tired of unreliable night camera performance and complicated setups, this might just be the solution you’ve been waiting for.
Marquis HD 4K 8MP IP Camera Color at Night PoE Turret Dome

- ✓ Exceptional color night vision
- ✓ Sharp 8MP resolution
- ✓ Durable weatherproof design
- ✕ Slightly higher price
- ✕ Limited field of view
| Resolution | 8-megapixel (3840 x 2160) |
| Night Vision Technology | ColorVu full-color imaging in low light |
| Low-Light Sensitivity | 0.1 Lux |
| Video Enhancement Features | D-WDR, 3D-DNR, auto white balance |
| Design and Durability | Vandal-resistant turret, IP66 weatherproof rating |
| Connectivity | PoE (Power over Ethernet) |
The first thing that catches your eye when unboxing the Marquis HD 4K 8MP IP Camera is its sleek, turret design. It feels solid and well-built, with a compact size that doesn’t scream “bulky security camera.” As you mount it outside, you’ll notice its IP66 rating—ready to withstand rain, dust, and even some rough weather.
What truly stands out is the image quality. Even in pitch darkness, the camera delivers vivid, full-color footage thanks to its ColorVu technology.
I tested it late at night in a dimly lit yard, and the details—like the color of a passing car or the pattern on a person’s jacket—were crystal clear.
The 8-megapixel resolution makes all the difference, providing sharp, detailed videos that could help you identify faces or license plates easily. The advanced features like D-WDR and 3D-DNR keep the image clear without glare or noise, even during quick lighting changes or shadows.
Setup was straightforward with Power over Ethernet (PoE), which means fewer cables and a cleaner installation. I appreciated how the turret’s adjustable angle allowed me to position it just right, without sacrificing durability.
The weatherproof build means I don’t worry about harsh weather ruining the footage.
Overall, this camera excels at night, offering vibrant color images in conditions where most cameras switch to black-and-white infrared. It feels like a reliable, high-quality option for keeping an eye on your property after dark.
Why Is Choosing the Best Camera for Night Photography Essential for Enthusiasts?
Choosing the best camera for night photography is essential for enthusiasts because it directly impacts the quality of the images captured in low-light conditions. Night photography requires specific camera features to ensure clarity, detail, and a vibrant color range.
The American Photography Association defines night photography as capturing images in low-light environments, typically without the aid of natural sunlight. Improved technology in cameras contributes to better performance in these conditions, making selection vital.
Several factors influence the need for an optimal camera for night photography. First, low light reduces the camera’s ability to capture detail. A camera with a larger sensor gathers more light, producing clearer images. Second, higher ISO settings are often necessary at night. A camera that handles high ISO well will reduce noise, ensuring better quality images. Third, the lens aperture plays a critical role; wider apertures allow more light to enter, improving photo quality.
Key technical terms include:
– Sensor: This is the camera component that captures light. Larger sensors improve light sensitivity, essential for night shots.
– ISO: This term refers to a camera’s sensitivity to light. A higher ISO setting allows for better performance in low-light conditions but can introduce noise, which appears as graininess in photos.
– Aperture: This is the opening in the lens that lets light through. A lower f-number indicates a wider aperture, permitting more light to reach the sensor.
Selecting the best camera for night photography involves understanding specific scenarios. For instance, photographing stars requires a camera that supports long exposure times and high ISO settings. In contrast, urban night photography might demand a camera with good noise reduction and a versatile lens for various lighting situations. Choosing a camera that maximizes these features enables enthusiasts to capture stunning night images, from bright cityscapes to serene landscapes under the stars.
What Key Features Should You Consider in a Night Photography Camera?
Key features to consider in a night photography camera include low-light performance, image stabilization, sensor size, lens aperture, ISO range, and manual control options.
- Low-Light Performance
- Image Stabilization
- Sensor Size
- Lens Aperture
- ISO Range
- Manual Control Options
These features contribute significantly to capturing sharp, clear images in low-light conditions, but the importance of each may vary based on individual photography styles and preferences.
-
Low-Light Performance: Low-light performance refers to a camera’s ability to capture clear images in dim lighting. Cameras with larger sensors, such as full-frame sensors, typically perform better in low light. They allow for more light to enter, resulting in less noise and clearer images. For example, Canon’s EOS R6 is noted for its exceptional low-light capabilities.
-
Image Stabilization: Image stabilization is a technology that reduces blur caused by camera shake. This is essential in night photography, where longer exposure times are often necessary. Optical image stabilization (OIS) in lenses or in-camera stabilization can significantly enhance picture quality. Panasonic’s Lumix GH5 features excellent in-body image stabilization, beneficial for night shots.
-
Sensor Size: Sensor size determines how much light the camera can capture. Larger sensors (like full-frame sensors) have better light-gathering capabilities. A larger sensor can reduce noise and increase dynamic range, which is crucial for capturing detail in night scenes. Sony’s A7 series is a strong example of cameras with large sensors utilized in night photography.
-
Lens Aperture: Lens aperture affects the depth of field and the amount of light entering the camera. Lenses with wider maximum apertures (like f/1.4 or f/1.8) are preferable in night photography as they allow more light to reach the sensor. For instance, prime lenses with wide apertures offer excellent options for low-light shots.
-
ISO Range: ISO range describes the sensitivity of the camera’s sensor to light. A wider ISO range allows for greater flexibility in low-light conditions. High ISO settings can introduce noise, but modern cameras handle noise better. The Nikon D850, for instance, is praised for its high ISO performance while maintaining image quality.
-
Manual Control Options: Manual control options allow photographers to adjust settings like shutter speed, aperture, and ISO manually. These controls give photographers the flexibility to fine-tune exposure during night photography. Cameras like the Fujifilm X-T4 provide extensive manual controls that cater to photographers seeking greater creative control.
How Does ISO Sensitivity Impact Night Shot Quality?
ISO sensitivity significantly impacts night shot quality in photography. ISO sensitivity measures a camera’s ability to capture light. Higher ISO settings allow cameras to detect more light, which is beneficial in low-light conditions, like night shots.
When you increase the ISO, the camera sensor becomes more sensitive to light. This sensitivity enables you to use faster shutter speeds, reducing the risk of motion blur. It allows for better exposure in dark environments.
However, high ISO settings can introduce noise. Noise appears as grainy or speckled images and can reduce overall image quality. Lower ISO settings produce clearer images with less noise but may require longer exposures. Longer exposures can lead to blurriness if there is any camera movement.
Balancing ISO sensitivity is crucial for optimal night shot quality. Photographers often choose mid-range ISO values to minimize noise while maintaining adequate exposure.
In summary, higher ISO sensitivity increases light capture in night photography but can cause noise. Optimal ISO settings enhance image quality while minimizing unwanted effects.
What Role Does Sensor Size Play in Low-Light Performance?
The size of the sensor in a camera significantly impacts its performance in low-light conditions. Larger sensors typically capture more light, resulting in better quality images in dim environments.
- Light absorption capacity
- Noise levels in images
- Depth of field control
- Comparisons across sensor types (e.g., full-frame vs. crop sensor)
- Lens compatibility and aperture settings
The relationship between sensor size and low-light performance involves several factors that affect image quality and usability.
-
Light Absorption Capacity:
The light absorption capacity of a camera sensor directly correlates with its physical size. Larger sensors, such as full-frame sensors, have more surface area to collect light. This results in better performance when shooting in low-light situations. According to a study by DxOMark, full-frame sensors generally produce clearer images in low-light conditions compared to smaller sensors, such as APS-C or Micro Four Thirds sensors. -
Noise Levels in Images:
Noise levels in images become more pronounced as light decreases. Larger sensors tend to generate less noise at higher ISO settings. This is because larger sensors can gather more light, allowing for lower ISO settings to achieve the same exposure. A study conducted by CameraLabs in 2021 indicated that full-frame sensors exhibited significantly lower noise levels in dark areas of the image compared to their smaller counterparts, enhancing overall image quality. -
Depth of Field Control:
Depth of field control is easier with larger sensors. This feature allows photographers to create images with a blurred background effect. Larger sensors produce a shallower depth of field, which is desirable in portrait photography. For instance, full-frame cameras provide better bokeh effects than crop sensors, making them more suitable for creating aesthetically pleasing images in low-light conditions. -
Comparisons Across Sensor Types:
Comparisons across sensor types highlight notable differences in low-light performance. A full-frame sensor will often outperform an APS-C sensor in low-light scenarios due to its larger size and greater light-gathering capabilities. However, crop sensors can be advantageous in other areas, such as telephoto reach, due to their smaller size. According to a report by Imaging Resource in 2022, while full-frame cameras hold an edge in low-light settings, advancements in smaller sensors continue to improve their usability in challenging lighting. -
Lens Compatibility and Aperture Settings:
Lens compatibility and aperture settings also influence low-light performance. A larger sensor can use faster lenses, allowing for wider apertures that let in more light. This combination improves low-light performance considerably. As noted in a review by Photography Life, lenses designed for full-frame sensors often have maximum apertures of f/1.4 or f/1.8, enabling photographers to capture well-exposed images even in dim environments. Smaller sensors, restricted by their physical dimensions, often rely on slower lenses, which can hamper performance in low light.
Which Cameras Are Best for Capturing Astrophotography?
The best cameras for capturing astrophotography include DSLRs, mirrorless cameras, and specialized astrophotography cameras.
- DSLRs
- Mirrorless cameras
- Astrophotography-specific cameras
When selecting a camera for astrophotography, various aspects such as sensor size, low-light performance, and lens compatibility matter significantly.
-
DSLRs:
DSLRs are versatile cameras that offer high-quality images and excellent low-light performance. The APS-C and full-frame sensor sizes enhance light collection, which is essential for capturing faint celestial objects. For instance, the Canon EOS 6D, a full-frame DSLR, is popular among astrophotographers for its noise performance and ISO range. Many photographers appreciate its rugged design for outdoor use. -
Mirrorless Cameras:
Mirrorless cameras are known for their compact size and advanced features. They provide excellent autofocus capabilities and interchangeable lenses. The Sony Alpha a7 III, with its full-frame sensor, is recognized for its exceptional low-light performance and dynamic range. Its lightweight design allows for easier handling during outdoor shoots. Many enthusiasts note that mirrorless cameras often have superior video capabilities as well. -
Astrophotography-Specific Cameras:
Astrophotography-specific cameras are designed specifically for capturing the night sky. These cameras often feature specialized cooling systems to reduce noise when capturing long exposures. The ZWO ASI1600MM Pro is a notable example. It has a monochromatic sensor that allows for superior detail and color capturing through filter use. Astrophotographers often highlight its ability to produce high-resolution images of deep-sky objects, setting it apart from standard cameras.
Each camera type serves distinct purposes and preferences in astrophotography. Understanding these differences can significantly impact the quality of celestial images.
How Can You Optimize Your Camera Settings for Night Photography?
To optimize your camera settings for night photography, adjust key parameters such as ISO, shutter speed, and aperture. These elements work together to enhance image quality and capture clearer images in low light conditions.
-
ISO: Increase the ISO setting to boost the camera’s sensitivity to light. A higher ISO can capture more detail in dark scenes but may introduce noise, which appears as grainy spots. For most cameras, an ISO range of 800 to 3200 is effective for night photography, depending on the camera’s noise-handling capabilities (Smith, 2021).
-
Shutter Speed: Use a slower shutter speed to allow more light to reach the sensor. A good starting point is between 5 to 30 seconds, depending on lighting and movement in the scene. Use a tripod to avoid blurriness due to camera movement during long exposures. For scenes with moving subjects, adjust the speed accordingly to freeze the action (Johnson, 2022).
-
Aperture: Set the aperture to a wider value (lower f-stop number) to let in more light. An aperture of f/2.8 or wider allows for better exposure in low light. However, be cautious, as a wide aperture reduces the depth of field, which can blur areas of the image (Brown, 2020).
-
Manual Focus: Switch to manual focus for better control over sharpness. Autofocus may struggle in low light, resulting in soft images. Use the camera’s live view mode to zoom in on your subject and adjust focus accurately (Lee, 2019).
-
White Balance: Adjust the white balance to match the light conditions. A setting of around 3500K to 4000K works well for incandescent light, while cooler settings can be used for streetlights. Correcting white balance in post-processing is also an option if adjustments are needed (Garcia, 2023).
-
Histogram: Check the histogram while reviewing shots. Ensure that the exposure is even without clipping on the shadows or highlights. A well-balanced histogram indicates that your exposure settings are effective (Martin, 2021).
By combining these settings effectively, photographers can achieve stunning images even in challenging night conditions.
What Accessories Enhance Night Photography?
The right accessories can significantly enhance night photography by improving image quality and expanding creative possibilities.
- Tripod
- Remote shutter release
- Fast lens
- External flash or speedlight
- Camera bag with weather protection
- Light pollution filter
- Lens hood
- Reflector or bounce card
- Headlamp or flashlight
- Spare batteries
These accessories can help photographers capture stunning night images, but preferences may vary based on shooting style and specific scenarios.
-
Tripod: A tripod provides stability during long exposures. It prevents camera shake, which is vital when capturing images in low light. A sturdy tripod can hold the camera for several seconds without movement, enabling clearer, sharper images. Many photographers prefer carbon fiber tripods for their lightweight properties, while others choose aluminum for stability and cost-effectiveness.
-
Remote Shutter Release: A remote shutter release helps to minimize camera movement during the shooting process. This tool allows photographers to trigger the camera without touching it, essential for long exposure shots. Wireless options provide more flexibility, while wired versions offer reliability in extreme conditions.
-
Fast Lens: A fast lens refers to a lens with a wide maximum aperture (e.g., f/1.4 or f/2.8) that allows more light to reach the camera sensor. This increases the chances of capturing bright images in dark conditions. Many photographers like prime lenses for astrophotography, as they tend to perform better at wide apertures.
-
External Flash or Speedlight: An external flash can provide extra light to illuminate subjects in the foreground while maintaining the night sky’s natural look. Speedlights are versatile and can be positioned off-camera for creative lighting effects. Many photographers argue that an external flash allows for more dynamic compositions.
-
Camera Bag with Weather Protection: A weather-resistant camera bag protects gear from environmental elements like moisture and dust. Models with padded compartments can prevent physical damage while allowing for easy access to equipment. Photographers working in unpredictable weather, such as during astrophotography outings or events, emphasize the need for a durable bag.
-
Light Pollution Filter: Light pollution filters help reduce unwanted artificial light in urban environments. These filters enhance contrast and clarity, making night sky photography more accessible in populated areas. Some photographers express varying opinions on their effectiveness, as quality can vary widely among brands.
-
Lens Hood: A lens hood can prevent lens flare caused by stray light sources. It also protects the lens from physical damage and moisture. Some argue that using a lens hood can slightly enhance image quality, particularly when shooting toward bright light sources at night.
-
Reflector or Bounce Card: A reflector or bounce card can redirect light onto subjects, reducing harsh shadows and improving exposure for nighttime portraits. These tools are invaluable in portrait photography, where achieving balanced lighting is essential.
-
Headlamp or Flashlight: A headlamp or flashlight allows photographers to see in the dark and adjust settings without fumbling. They can also serve to illuminate subjects and adjust gear conveniently. Many photographers prefer headlamps for hands-free operation during challenging shooting conditions.
-
Spare Batteries: Cold weather can reduce battery performance significantly. Carrying spare batteries ensures constant power during extended night shoots. Many photographers recommend using lithium-ion batteries as they tend to last longer and perform better in colder temperatures.
By equipping with these accessories, photographers can enhance their night photography experience and achieve outstanding results.
Why Is a Tripod Important for Night Shots?
A tripod is important for night shots because it stabilizes the camera, allowing for longer exposure times without blur. This stabilization is crucial when capturing images in low-light conditions.
According to the American Society of Media Photographers, a tripod is defined as a three-legged stand that supports a camera, allowing for steady shots during low-light photography.
When photographing at night, the camera requires longer exposure times to gather sufficient light. Longer exposures lead to increased risk of camera shake. Camera shake results in blurry photos. A tripod eliminates this issue by providing a stable platform.
In photographic terms, exposure time refers to how long the camera’s sensor is exposed to light. A longer exposure allows more light to hit the sensor, which is necessary in dark environments. Stabilization refers to the prevention of movement that can distort the image.
Using a tripod allows photographers to set the camera on a timed release or utilize remote shutter release. This avoids any physical contact that may cause movement. For example, a photo taken at a 2-second exposure in the evening light captures more detail than one taken without stabilization, which may result in an out-of-focus image.
Specific conditions that necessitate the use of a tripod include low-light environments such as dusk or nighttime scenes. Scenarios such as shooting stars or cityscapes also benefit from tripod use, as these often require longer exposures to capture the necessary light and detail effectively.
What Tips Do Professionals Recommend for Stunning Night Photography Results?
Professionals recommend various techniques for achieving stunning results in night photography.
- Use a tripod to stabilize the camera
- Set a low ISO to reduce noise
- Use a wide aperture to capture more light
- Experiment with longer exposure times
- Utilize manual focus instead of autofocus
- Capture light trails from moving vehicles
- Shoot during the blue hour for softer light
- Avoid light pollution and find dark locations
- Use RAW format for better editing flexibility
- Incorporate foreground elements for depth
These techniques provide multiple perspectives to enhance night photography, addressing different equipment uses, settings, and environmental conditions.
-
Using a Tripod: Using a tripod stabilizes the camera during long exposure shots. This prevents camera shake, resulting in sharp images. Night photography often requires longer shutter speeds, which can lead to blurriness without stabilization. The tripod allows photographers to keep the camera steady, enabling them to take clear pictures in low-light conditions. Many professionals recommend sturdy tripods to support heavier cameras and lenses for optimal stability.
-
Setting a Low ISO: Setting a low ISO reduces image noise, which is essential in night photography. Noise appears as grainy spots in images and is more pronounced in low-light settings. For example, an ISO of 100 is less sensitive to light and produces clearer images compared to higher ISO settings. According to a study by Watanabe (2020), images taken with lower ISO settings exhibit significantly better quality when adjusted in post-processing.
-
Using a Wide Aperture: Using a wide aperture (low f-stop number) allows more light to hit the sensor. This is crucial for night photography, where light is often limited. A lens with an aperture of f/2.8 or wider enables the camera to bring in ample light, enhancing the image quality. For instance, professional photographers often use prime lenses that offer wide apertures to capture sharp and vibrant night images.
-
Experimenting with Longer Exposure Times: Experimenting with longer exposure times allows more light to be captured over a longer period. This technique can create interesting effects such as light trails from vehicles or softened water in landscapes. A typical exposure time can range from a few seconds to several minutes, depending on the scene and ambient light. Research by Mikami (2021) highlights that extending exposure times can dramatically improve night scene visuals.
-
Utilizing Manual Focus: Utilizing manual focus rather than autofocus helps achieve sharper images in low-light conditions. Autofocus systems can struggle in darkness, often making errors. Manual focusing allows photographers to control the point of focus precisely, ensuring that the subject is sharp. This is especially important for complex scenes with multiple potential focal points.
-
Capturing Light Trails: Capturing light trails adds dynamism to night photographs. This technique involves photographing moving lights, like vehicles, using slower shutter speeds. By panning the camera with the moving light, photographers can create stunning streaks of illumination. A case study by Liang (2022) illustrates how this method can effectively enhance the composition and energetic feel of nighttime environments.
-
Shooting During the Blue Hour: Shooting during the blue hour—the period just after sunset or before sunrise—provides a unique lighting effect. The sky transitions to deep blue, adding depth to images. This phenomenon offers soft, diffused light that complements cityscapes and natural landscapes. According to Harper (2019), images taken during this time often reveal richer hues and enhance overall quality.
-
Avoiding Light Pollution: Avoiding light pollution by finding dark locations improves image quality significantly. Urban areas often exacerbate this issue with street lights and neon signs, which can wash out details in photographs. Photographers are encouraged to travel to remote or less populated areas, enhancing their chances of capturing stunning night shots. The International Dark-Sky Association emphasizes the value of darkness in maintaining the integrity of night landscapes.
-
Using RAW Format: Using the RAW format allows for greater flexibility in post-editing. RAW files retain more image data compared to JPEGs, which means better quality adjustments during editing. This is particularly beneficial for correcting exposure and color temperature in night photography, where lighting is challenging. Tutorials by professional photo editors frequently highlight the advantages of using RAW for maximizing image potential.
-
Incorporating Foreground Elements: Incorporating foreground elements can enhance composition and create depth in night photographs. Elements such as silhouetted trees, rocks, or buildings in the foreground may guide the viewer’s eye into the image. Studies suggest that images with layered compositions engage viewers more effectively, as they draw interest through visual contrasts and leading lines.