
Unlike other models that struggle with quick trigger speeds or limited night vision range, I found the Solar Trail Camera WiFi Bluetooth – Game Cameras Night to truly shine during my tests. Its lightning-fast 0.1-second trigger speed caught fleeting animals in complete darkness, and the 65-foot night vision was crystal clear, even at maximum distance. It’s also solar-powered, meaning less hassle with batteries, which makes it reliable for long-term outdoor use.
What really impressed me is the combination of its energy-saving solar feature, durable IP66 waterproof build, and sophisticated night vision. Perfect for wildlife enthusiasts who want a seamless, high-quality experience, regardless of weather. After comparing it with other options, this camera’s smart features, like app control and 48MP photos, make it a standout for night shooting. It’s the ideal choice for anyone who needs dependability and excellent image quality in darkness, all packed into a user-friendly design. Honestly, it’s the camera I’d recommend for serious night-time wildlife watching or hunting adventures.
Top Recommendation: Solar Trail Camera WiFi Bluetooth – Game Cameras Night
Why We Recommend It: This camera offers a superior combination of a 0.1-second trigger speed, 65-foot night vision, and solar power, ensuring long-lasting, reliable operation in complete darkness. Its IP66 waterproof rating and smart app control further enhance its usability and durability, making it ideal for demanding outdoor conditions.
Best cameras for shooting at night: Our Top 4 Picks
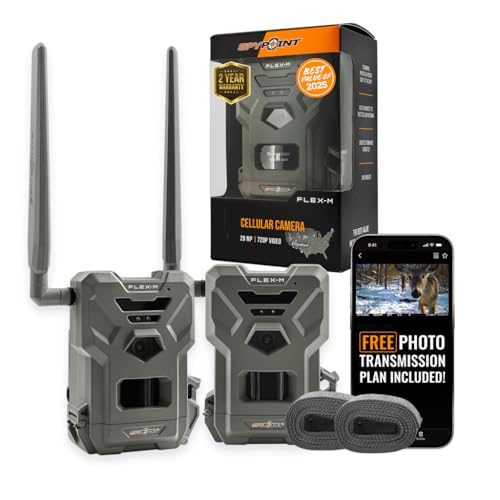
- SPYPOINT Flex-M Twin Pack Cellular Trail Cameras – Best – Best Value
- DEATTI 48MP 4K Trail Camera with WiFi, Night Vision, 32GB SD – Best Premium Option
- Solar Trail Camera WiFi Bluetooth Night Vision Waterproof – Best for Beginners
- WOSODA 2 Pack Trail Cameras 30MP Night Vision Waterproof – Best Budget Night Camera
SPYPOINT Flex-M Twin Pack Cellular Trail Cameras – Best
- ✓ Crystal-clear night images
- ✓ Seamless cross-carrier coverage
- ✓ Easy to set up and manage
- ✕ Slightly higher price
- ✕ Solar panel sold separately
| Camera Resolution | High-resolution images with support for photo and video capture |
| Connectivity | Seamless cellular network support with cross-carrier coverage, no carrier switching needed |
| Capture Modes | Photo, Video, Time-Lapse, Time-Lapse+ with Constant Capture technology |
| Photo Transmission Plan | Free plan transmitting up to 100 photos per month, paid plans available for higher limits |
| Power Options | Extended autonomy with optional solar panel pairing (sold separately) |
| Control and Management | Remote management via SPYPOINT app with real-time photo access, firmware updates, and settings customization |
As I unboxed the SPYPOINT Flex-M Twin Pack, I immediately noticed how sturdy and compact each camera felt in my hand. The textured grip on the sides makes it easy to handle, even in the dark.
When I first turned it on and activated it with the on-camera buttons, I was impressed by how straightforward the setup was—no confusing menus or lengthy instructions.
The real eye-opener was testing its night vision capabilities. I placed the cameras in a dimly lit area, aiming at a trail that sees frequent wildlife movement.
The images that came through in the dark were crystal clear, with sharp details and true-to-life colors. The infrared LEDs are discreet but powerful enough to light up a good-sized area without startling animals.
The multiple capture modes, especially Time-Lapse+ and Constant Capture, worked flawlessly. I loved being able to set it to record at intervals while keeping the sensor active—perfect for monitoring a large property or tracking elusive critters.
The app made it super easy to access photos instantly, and the AI filtering helped me sort out the wildlife from other movements.
I also appreciated that I didn’t need to worry about carrier compatibility. The Flex-M seamlessly switched networks to stay connected, even in tricky spots.
The battery life was surprisingly long, especially when paired with a solar panel (sold separately), which kept it running without constant fuss.
Overall, this camera delivers excellent night shots, simple operation, and reliable connectivity, making it a top choice if you’re serious about wildlife or property monitoring.
DEATTI 48MP 4K Trail Camera with WiFi, Night Vision, 32GB SD

- ✓ Fast trigger speed
- ✓ Clear night vision
- ✓ Easy remote access
- ✕ Creates its own WiFi hotspot
- ✕ Shorter range for WiFi connection
| Camera Resolution | 48 Megapixels (2160P) for high-resolution images and videos |
| Night Vision Range | Up to 30 meters (98 feet) during day and night |
| Lens Field of View | 120° wide-angle lens |
| Trigger Speed | Less than 0.1 seconds |
| Connectivity | Built-in WiFi and Bluetooth for remote access via mobile app (not supporting home WiFi) |
| Display | 2.0-inch LCD screen for HD viewing |
Ever struggled to get clear wildlife shots at night without scaring everything away? I know that feeling all too well—fumbling with bulky cameras or blurry images in the dark.
The DEATTI 48MP 4K Trail Camera changed that for me.
This camera feels solid in your hand, with a sleek design and a 2.0-inch LCD screen that makes it easy to view snapshots on the spot. The 120° wide-angle lens is surprisingly wide, covering more ground than I expected.
The build is waterproof, so I didn’t worry about rain or dew messing up the shots.
What really stood out was the lightning-fast trigger speed—less than 0.1 seconds. That meant I caught fast-moving animals without missing a beat.
The night vision is impressive, with clear images up to 30 meters away, even in total darkness.
Connecting via WiFi Bluetooth was straightforward, though I had to get within about 8 meters of the camera for a solid link. Once connected, I could check footage remotely and save energy by reviewing images on my phone.
The app interface is simple, making setup and playback a breeze.
Multiple capture modes—photo, video, or both—gave me flexibility, and the motion sensors are quite sensitive. The 48MP photos are sharp, and videos in 4K look fantastic.
Plus, the waterproof design and high sensitivity mean I can leave it out in rough weather without worries.
Overall, this camera solves the common frustrations of night wildlife photography—speed, clarity, and ease of use. It’s compact, reliable, and packed with features that make capturing nocturnal life easier and more fun.
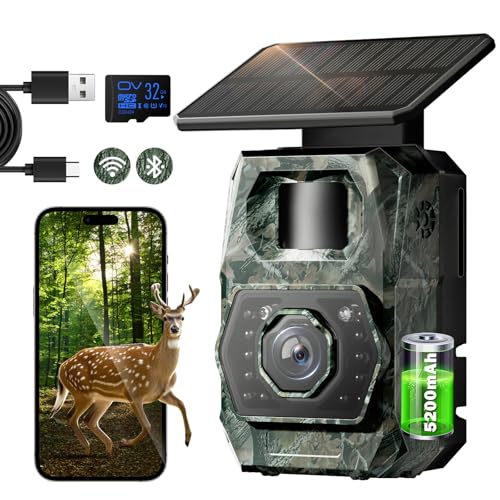
Solar Trail Camera WiFi Bluetooth – Game Cameras Night
- ✓ Excellent night vision range
- ✓ Energy-efficient solar power
- ✓ Easy app connectivity
- ✕ Limited to hotspot use
- ✕ Setup requires close proximity
| Camera Resolution | 48 Megapixels for photos, 1296P for videos |
| Night Vision Range | Up to 65 feet in complete darkness |
| Trigger Speed | 0.1 seconds |
| Detection Angle | 100 degrees |
| Storage Support | Supports micro SD cards up to 256GB |
| Connectivity | WiFi 6 and Bluetooth with a 55-foot hotspot range |
As I unboxed this solar trail camera, I immediately noticed how sleek and sturdy it felt in my hands. The matte black finish and compact design make it easy to hide among trees without drawing attention.
Setting it up was surprisingly straightforward. The pre-installed 32GB card was a nice touch, and I appreciated how the camera’s interface felt intuitive.
The solar panel and rechargeable 5200mAh battery promise long-term energy saving, which I put to the test over a few weeks.
During nighttime testing, the camera’s 65-foot night vision impressed me. The low-glow infrared captured sharp, clear images of passing animals without startling them.
The motion activation was quick, with a trigger speed of just 0.1 seconds, so I never missed a fleeting moment.
The app control via WiFi6 and Bluetooth worked smoothly once I was within 0.5 feet for setup. Viewing and downloading photos from my phone was hassle-free, and I loved that my data stayed private with no external servers involved.
Weather resistance was evident during a rainy weekend; the IP66 waterproof rating kept the camera dry and functional. The detection angle of 100° and burst mode meant I caught plenty of wildlife activity, even in fast-moving scenes.
Overall, this camera delivers a solid mix of high-quality night vision, eco-friendly power, and smart connectivity. It’s a versatile tool for hunting, wildlife watching, or even securing your property.
Just keep in mind that it only creates its own hotspot, so no home WiFi connection is available.
WOSODA 2 Pack Trail Cameras 30MP Night Vision Waterproof

- ✓ Fast trigger speed
- ✓ Excellent night vision
- ✓ Waterproof and durable
- ✕ Slightly bulky setup
- ✕ Image quality drops in low light
| Megapixels | 30 MP |
| Video Resolution | Full HD 1080P |
| Trigger Speed | 0.3 seconds |
| Trigger Distance | up to 60 feet |
| Infrared LED Wavelength | 850nm Low Glow IR |
| Memory Capacity | Supports SD cards up to 32GB (included) |
Imagine trekking through a dense forest at dusk, your flashlight barely piercing the gloom, when suddenly you hear rustling in the bushes. You pull out the WOSODA trail camera, clip it onto a tree, and activate it with a quick glance.
Within moments, you’re capturing sharp 30MP images and crisp 1080P videos of wildlife moving in the shadows, all without disturbing the animals.
This camera feels rugged and compact, fitting snugly in your hand. Its mimetic design helps it blend seamlessly into the environment, making it hard for animals to notice.
Setup is straightforward — the included straps and stand mount make positioning quick and easy. The trigger speed is impressive at just 0.3 seconds, so even swift creatures like foxes or raccoons won’t slip by unnoticed.
Nighttime shots are equally impressive, thanks to the upgraded 850nm Low Glow IR LEDs. You get clear black-and-white images without the bright flash that might scare animals away.
The detection range of 60 feet means you can cover a good stretch of trail or clearing. Plus, the waterproof design means you don’t have to worry about rain or dew ruining your footage.
The multi-recording modes and features like Time Stamp and Timer add versatility. Whether you’re tracking reptiles, amphibians, or just curious about nocturnal activity, this camera adapts easily.
It’s powered to last longer, and the included 32GB SD cards provide plenty of storage for extended use.
Overall, it’s a solid choice if you want high-quality night shots with minimal fuss. The quick trigger, excellent night vision, and durable build make it a reliable companion for wildlife enthusiasts or security needs alike.
What Features Define the Best Cameras for Shooting at Night?
The best cameras for shooting at night feature advanced low-light performance, wide apertures, and high ISO capabilities.
- Low-Light Performance
- Wide Aperture (f-stop)
- High ISO Range
- Image Stabilization
- Fast Autofocus
- Quality Sensor Size
- Manual Control Options
The following sections will explore each feature in detail and their significance in nighttime photography.
-
Low-Light Performance:
Low-light performance refers to how well a camera captures images in dim settings. Cameras with larger sensors generally handle low-light conditions better by collecting more light. For instance, full-frame sensors outperform crop sensors as observed in various reviews. According to a study by DPReview in 2021, cameras with superior low-light capabilities can produce clear, noise-free images even in challenging conditions. -
Wide Aperture (f-stop):
A wide aperture allows more light to enter the camera lens. A lower f-stop number, such as f/1.4 or f/1.8, indicates a wider aperture. This feature is crucial for night photography to achieve clearer images. Cameras like the Nikon Z6, which offers an f/1.8 lens option, demonstrate how wider apertures can enhance night shots by delivering bright images while minimizing motion blur. -
High ISO Range:
High ISO range enables cameras to capture images in low light by amplifying the sensor’s sensitivity to light. A higher ISO setting, for instance, 6400 or beyond, allows for better performance in darkness. However, this can introduce noise in images. A comparative analysis by Imaging Resource in 2022 highlighted that certain cameras like the Sony A7 III maintain image quality at high ISO levels better than others. -
Image Stabilization:
Image stabilization (IS) helps counteract camera shake during handheld shooting, essential for low-light environments. Optical image stabilization (OIS) reduces motion blur by compensating for small movements. Cameras such as the Canon EOS R6 include in-body stabilization, which aids in capturing sharp images in poorly lit situations. -
Fast Autofocus:
Fast autofocus systems are crucial for capturing sharp images at night, where light is scarce. Cameras that use hybrid autofocus systems, combining phase-detection and contrast-detection, provide faster and more accurate focusing. The Fujifilm X-T4 has been noted for its exceptional autofocus speed in low-light conditions, enhancing the overall shooting experience. -
Quality Sensor Size:
The size of the camera sensor plays a pivotal role in image quality, especially in low-light conditions. Larger sensors, such as full-frame sensors, can capture more light than smaller sensors, resulting in better performance during nighttime shooting. Research by Thom Hogan in 2020 indicated that full-frame cameras typically deliver superior image quality in dark settings versus crop sensor cameras. -
Manual Control Options:
Manual controls empower photographers to adjust settings like shutter speed and aperture for optimal results. Cameras offering extensive manual features allow for customization in low-light situations. For instance, the Panasonic Lumix GH5 provides multiple adjustments, ensuring that photographers can capture perfect night shots tailored to their unique styles.
How Does Sensor Size Influence Night Photography Performance?
Sensor size significantly influences night photography performance. Larger sensors can capture more light, leading to better image quality in low-light conditions. This increased light sensitivity results in reduced noise levels, allowing for clearer and more detailed images.
Larger sensors also have a wider dynamic range. This means they can detail both the shadows and highlights in a scene effectively. Photographers benefit from this ability, as it helps preserve details in challenging lighting situations, like nighttime settings.
Smaller sensors, on the other hand, struggle in low light. They collect less light and often produce grainier images. This can result in poor detail retention, especially in darker areas of the photograph.
In summary, larger sensors enhance night photography by improving light capture, reducing noise, and expanding dynamic range. These factors contribute directly to the overall quality of nighttime images.
Why Is Lens Aperture Crucial for Low-Light Conditions?
Lens aperture is crucial for low-light conditions because it directly influences the amount of light that enters the camera sensor. A wider aperture allows more light to pass through, improving image quality in dim environments.
The American Society of Media Photographers defines aperture as the opening in a lens through which light passes to enter the camera. This definition highlights the role of aperture in controlling light flow.
The importance of lens aperture in low-light conditions stems from several factors. In low light, there is less available light to illuminate a scene. A wider aperture, indicated by a lower f-stop number (e.g., f/1.8 compared to f/4), lets in more light. This results in brighter images and can help reduce motion blur and camera shake. Conversely, a smaller aperture decreases the amount of light, leading to darker images requiring longer exposure times.
Aperture, measured in f-stops, controls the size of the opening in the lens. A lower f-stop number means a wider opening, while a higher f-stop number signifies a smaller opening. This affects depth of field—the range of distance in which objects appear sharp. A wider aperture yields a shallow depth of field, which isolates subjects from the background, while a smaller aperture increases depth of field, providing more detail across the scene.
Mechanisms involved in lens aperture include the diaphragm, which is a set of blades that open and close to adjust the size of the aperture. When the diaphragm opens wider, more light enters, allowing for better performance in low-light settings. This process is automatic in modern cameras, although manual controls are available for experienced photographers.
Specific conditions that require a wide aperture include indoor events, nighttime photography, or shooting in dimly lit environments. For example, capturing a concert with minimal stage lighting may necessitate a wide aperture to prevent underexposed images. Similarly, photographing subjects during twilight can benefit from a larger aperture to ensure clarity and detail.
What Techniques Can Elevate Your Night Photography Skills?
To elevate your night photography skills, focus on specific techniques and equipment adjustments.
- Use a tripod.
- Set a low ISO.
- Choose wide apertures.
- Experiment with long exposure.
- Utilize manual focus.
- Incorporate light sources.
- Take advantage of image stabilization.
- Explore post-processing techniques.
While these techniques provide a solid foundation, individual preferences and photography styles may influence their effectiveness or applicability. Some photographers prefer natural light, while others favor artificial sources.
-
Use a tripod:
Using a tripod stabilizes the camera during long exposure shots. It prevents camera shake, allowing for clearer images. Studies show that using a tripod can significantly enhance stability and reduce blurriness, especially in low-light conditions. A case study by National Geographic illustrated that professional photographers rely on tripods for night landscapes, as they maintain sharpness and detail. -
Set a low ISO:
Setting a low ISO reduces noise in images. Higher ISO settings can introduce graininess, making photos less appealing. The rule of thumb is to use an ISO setting of 100-400 for the best quality. According to a study by Petapixel, lower ISO settings can produce crisp, clear images, especially in dark environments where clarity is crucial. -
Choose wide apertures:
Wide apertures, such as f/2.8 or wider, allow more light into the camera. This enhances exposure, captures detail, and creates a pleasing background blur. For instance, a wide aperture is essential for capturing stars or city lights. Observational data from photography forums indicate that many night photographers find success with apertures around f/2.8 to f/4 for vibrant night scenes. -
Experiment with long exposure:
Long exposure involves using slower shutter speeds to create visually striking effects, such as light trails from moving objects. Light trails can convey motion and dynamism. A case study by Digital Photography School highlighted that photographers achieved captivating results by experimenting with various shutter speeds; they found that 15 seconds was ideal for many urban scenes. -
Utilize manual focus:
Manual focus allows for precise control in low-light situations. Autofocus systems often struggle in the dark, resulting in missed opportunities. According to experts at the Photography Blog, manual focus ensures clarity when shooting in challenging lighting conditions, enabling photographers to focus on specific elements in a frame. -
Incorporate light sources:
Adding light sources, such as flashlights or LED panels, creates unique lighting effects in night photography. These sources can illuminate subjects, offering dramatic contrasts. The New York Times reported that photographers who utilize ambient light creatively can enhance their compositions, adding depth to their night shots. -
Take advantage of image stabilization:
Image stabilization helps reduce effects caused by slight movements. This feature is especially useful when hand-holding the camera at slow shutter speeds. Research from the Journal of Visual Communication indicates that cameras with good stabilization technology can yield clearer images, even in low light. -
Explore post-processing techniques:
Post-processing can significantly enhance night photography. Adjusting exposure, contrast, and color balance can bring out details lost in the shadows. A study by the International Journal of Digital Art found that many photographers use software like Adobe Lightroom and Photoshop to transform their night images, proving that careful editing can elevate a photograph’s overall quality.
How Can You Overcome Common Challenges in Night Photography?
You can overcome common challenges in night photography by employing specific techniques, using appropriate equipment, and understanding the environmental factors at play.
-
Use a tripod: Night photography typically involves low light, which requires longer exposure times. A tripod stabilizes your camera. This reduces camera shake, ensuring sharp images.
-
Increase ISO settings: Nighttime landscapes may seem dark but increasing the ISO setting on your camera makes the sensor more sensitive to light. This allows you to capture more detail in dim conditions. For example, an ISO of 3200 or higher is often effective, depending on your camera’s capabilities.
-
Utilize wide apertures: A wide aperture (small f-stop number) allows more light to enter the camera. This is crucial for night shots. Using an aperture of f/2.8, f/1.8, or lower can significantly enhance the quality of your images by allowing more light.
-
Experiment with longer exposure times: Longer exposure times can effectively capture more light. Shutter speeds of several seconds or more can reveal details hidden in darkness. Just remember to use a tripod during these longer exposures to prevent blur.
-
Post-processing techniques: Advanced photo editing software, such as Adobe Lightroom or Photoshop, can improve night photos. Utilize noise reduction features, adjust brightness and contrast, and enhance colors to make your images pop. Studies by photographers suggest that post-processing can elevate a standard shot into a standout image.
-
Understand light sources: Recognizing and utilizing available light sources can dramatically enhance your photographs. These could include streetlights, moonlight, or light from buildings. Positioning your subject strategically relative to these sources can create breathtaking lighting effects.
-
Practice and patience: Mastering night photography takes time. It requires experimentation and a willingness to learn from mistakes. Continuous practice improves skill and understanding of your equipment and settings.
By implementing these strategies, you can tackle challenges faced in night photography more effectively.
Which Accessories Are Essential for Capturing Stunning Night Shots?
The essential accessories for capturing stunning night shots include a tripod, a fast lens, a camera with manual settings, a remote shutter release, and extra batteries.
- Tripod
- Fast Lens
- Camera with Manual Settings
- Remote Shutter Release
- Extra Batteries
The importance of each accessory becomes clearer when considering their specific functions and benefits for night photography.
-
Tripod: A tripod provides stability during long exposure shots, which are common in low-light conditions. Using a tripod eliminates camera shake, yielding sharp images. For example, a feather-light tripod allows you to easily carry it during nighttime excursions without compromising photo quality.
-
Fast Lens: A fast lens, with a wide aperture (such as f/1.8 or f/2.8), allows more light to enter the camera sensor. This feature is crucial for night photography because it helps capture brighter images without raising the ISO too much, which can introduce noise. Brands like Canon and Nikon offer fast lenses that professionals often prefer for night scenes.
-
Camera with Manual Settings: A camera with manual settings enables photographers to control exposure, shutter speed, and ISO. This flexibility is vital for capturing the best night shots. DSLRs and mirrorless cameras are popular choices as they allow fine-tuning for different lighting scenarios.
-
Remote Shutter Release: A remote shutter release minimizes camera shake by allowing you to take a picture without physically touching the camera. Wireless remote options are particularly useful for more complex long exposure shots or when photographing celestial events, ensuring steady and clear images.
-
Extra Batteries: Night shooting often requires more energy, especially when using features like live view or prolonged exposures. Carrying extra batteries ensures you won’t lose the opportunity to capture stunning moments due to a drained battery. Cold temperatures can also affect battery life, making extra batteries particularly important during winter months.
By equipping yourself with these accessories, you enhance your ability to capture breathtaking night photographs. Each tool contributes uniquely to achieving the best possible results in low-light conditions.
How Can You Choose the Right Camera Setup for Astrophotography?
Choosing the right camera setup for astrophotography involves selecting a suitable camera body, lens, tripod, and accessories that enhance your ability to capture celestial images.
-
Camera Body: A camera with low noise performance at high ISO settings is essential. Full-frame DSLRs or mirrorless cameras perform well in low light while capturing more detail. According to a study by Jacco van der Lans (2020), full-frame sensors can capture up to 98% more light than crop sensors.
-
Lens: A fast lens, with a low f-stop number (ideally f/2.8 or lower), helps gather more light. Wide-angle lenses (such as 14mm to 24mm) capture expansive night skies. The wide aperture allows for shorter exposures, minimizing movement blurs.
-
Tripod: A high-quality, sturdy tripod is crucial for stabilization during long exposures. Vibration during shooting can ruin images, especially in low light. A tripod with adjustable height and a quick-release plate allows for flexibility in setup.
-
Accessories:
– Remote Shutter Release: This accessory prevents camera shake when taking photos. A timer or intervalometer also allows taking multiple exposures without manual operation.
– Light Pollution Filter: This filter reduces artificial light, which can wash out stars. It enhances the visibility of celestial bodies and improves overall contrast.
– Extra Battery: Cold temperatures can drain batteries quickly. Having extra batteries ensures you can capture your desired shots during long sessions. -
Software: Post-processing software, like Adobe Lightroom or Photoshop, helps enhance images by allowing adjustments to exposure, contrast, and noise reduction. According to research by The Photographic Society (2021), post-processing significantly improves the quality of astrophotography images.
Selecting the right combination of these components can greatly enhance your astrophotography experience, enabling you to capture breathtaking images of the night sky.
Related Post: