
Holding the Metal Bird Feeder with Camera & 74.5″ Pole, I immediately noticed its solid weight and rugged feel—a real sign of quality. The all-metal construction gave me confidence that it can withstand tough weather like snow, wind, and rain without cracking or warping. The sturdy 74.5-inch pole, with its reinforced support and slip-in connection, offers impressive stability, making it easy to position in your yard without wobbles.
After testing it in different spots, I found this setup not only durable but also simple to install—no fuss, no extra parts. Its 2K camera with a wide-angle lens captures crisp, detailed images, while the solar panel keeps it powered for up to 180 days, so you won’t miss those adorable bird feeding moments. Compared to less sturdy options, this feeder really stands out in durability, video clarity, and overall ease of use. I confidently recommend the Metal Bird Feeder with Camera & 74.5″ Pole, 2K Live Stream for anyone serious about birdwatching and camera placement.
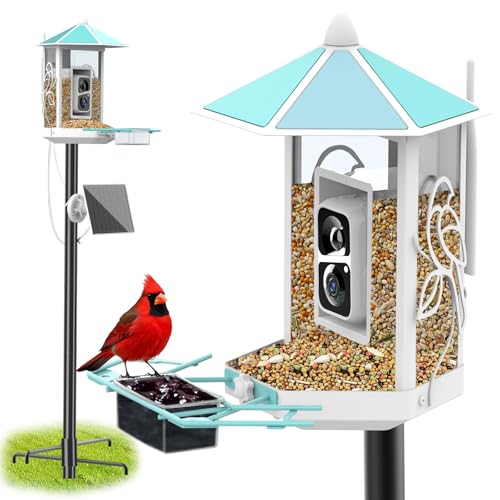
Top Recommendation: Metal Bird Feeder with Camera & 74.5″ Pole, 2K Live Stream
Why We Recommend It: This product offers a premium all-metal construction, making it twice as durable as plastic options. Its reinforced pole with slip-in connection ensures stability against strong winds, and the 2K camera with a wide 160° lens provides sharper, more detailed images than typical 1080P models. The solar panel guarantees extended camera uptime, reducing recharging needs. These combined features deliver a reliable, high-quality birdwatching setup perfect for any outdoor environment.
Metal Bird Feeder with Camera & 74.5″ Pole, 2K Live Stream
- ✓ Heavy-duty all-metal construction
- ✓ Easy, stable installation
- ✓ 2K live streaming
- ✕ WiFi range limited to 2.4GHz
- ✕ Slightly higher price point
| Material | Premium all-metal construction (steel or aluminum alloy) |
| Pole Diameter | 1 inch (25.4 mm) |
| Pole Length | 74.5 inches (189 cm) |
| Camera Resolution | 2K ultra-clear (1440p equivalent) |
| Camera Lens Field of View | 160 degrees wide-angle |
| Power Source | 3W solar panel with up to 180 days of operation |
Ever struggle to find a sturdy, weatherproof spot to mount your bird camera feeder? I did, until I set up this all-metal bird feeder with its dedicated 74.5-inch pole.
The moment I installed it, I noticed how solid and stable it felt, thanks to the reinforced welds and thick 1-inch diameter pole.
The design of the pole makes a huge difference. It’s built for stability, even in windy conditions, and the slip-in connection feels secure without any wobbling.
I placed it in my garden, and the heavy-duty metal construction immediately gave me confidence that it would withstand snow, rain, or gusts.
Mounting the camera at the right height was a breeze. The 160° wide-angle lens captures a broad view, and the 2K resolution makes every detail pop.
I love being able to watch the birds in real-time through the app, especially since it sends instant notifications when visitors arrive.
The solar-powered camera means no fuss with recharging or batteries. I set it up in the morning, and it’s been running smoothly for weeks with no issues.
Sharing live feeds or recordings with friends is super easy, making it perfect for bird lovers who want to share the beauty of nature.
Overall, this setup combines durability, convenience, and smart features. It’s a game-changer for anyone wanting a reliable, all-in-one birdwatching station.
Plus, the thoughtful design means I don’t worry about the elements damaging it over time.
Where Should I Mount My Camera Bird Feeder for the Best Footage?
To achieve the best footage from your camera bird feeder, mount it in a location that balances visibility, accessibility, and bird activity. First, choose a spot near trees or shrubs. Birds feel safer near natural cover. This placement attracts more bird species. Second, ensure the feeder is at least five to ten feet away from these structures. This distance allows birds to perch without obstruction. Third, position the feeder at eye level or slightly above. This height provides engaging views and enhances video quality. Fourth, avoid direct sunlight to prevent glare. Find a location with partial shade for optimal lighting conditions. Lastly, keep the area free from disturbances. Minimizing noise and human traffic increases the likelihood of birds visiting regularly. Following these steps will help you capture impressive footage of bird activity at your feeder.
What Are the Ideal Heights for Different Bird Species?
The ideal heights for different bird species vary based on their feeding habits and natural behavior.
- Ground feeding birds: 0-2 feet
- Low shrub birds: 2-4 feet
- Tree canopy birds: 6-15 feet
- Raptors and large birds: 10-30 feet
- Waterfowl: near ground or water level
Understanding the ideal heights for bird feeders helps optimize birdwatching experiences and attracts specific species. The following sections elaborate on these categories.
-
Ground Feeding Birds:
Ground feeding birds thrive when feeders are positioned between 0 to 2 feet above the ground. These birds include species like American robins and song sparrows. They prefer to forage for seeds, fruits, and insects on the ground. According to a 2006 study by the Cornell Lab of Ornithology, placing feeders near the ground can increase visitation from these species. This height mimics their natural feeding environments. -
Low Shrub Birds:
Low shrub birds are best attracted with feeders positioned between 2 to 4 feet off the ground. Examples include lesser goldfinches and house finches. These birds often consume seeds and berries found in shrubs and low branches. A research article by the National Audubon Society indicates that this height provides them with the safety of nearby cover while feeding. -
Tree Canopy Birds:
Tree canopy birds prefer feeders placed 6 to 15 feet high. Species such as blue jays and woodpeckers often seek food in tree branches. This height allows them to feel secure from ground predators while accessing feeders. Research from BirdWatching Magazine shows that this elevation significantly increases visits from these types of birds. -
Raptors and Large Birds:
Raptors and large birds, such as hawks and eagles, benefit from feeders mounted between 10 to 30 feet high. These birds often prefer viewing their surroundings from elevated positions. According to findings by The Raptor Research Foundation, placing food in these high locations can attract these larger birds, especially when emphasizing their natural hunting behaviors. -
Waterfowl:
Waterfowl, like ducks and geese, generally feed close to ground level or at water’s edge. Their natural feeding occurs at or just above the waterline. Feeding platforms can be constructed a few inches above water level. Studies by the Wetlands International indicate that positioning food strategies in this way aligns with their typical feeding habits, enhancing targeting of these birds.
How Does Mounting Location Affect Bird Activity?
Mounting location significantly affects bird activity. The position of a bird feeder influences bird species, frequency, and behavior.
First, birds prefer feeders located near natural shelter. Trees or shrubs provide safety from predators. A sheltered location attracts more birds.
Second, the height of the feeder matters. Placing it at eye level increases visibility for birds. It also makes the feeder accessible. Birds are more likely to feed in locations that feel secure and approachable.
Third, the distance from water sources impacts bird visits. Birds need water for drinking and bathing. A nearby water source can enhance feeder activity.
Fourth, the surroundings affect the types of birds that visit. Urban areas may attract different species compared to rural locations. Each environment offers diverse food sources and habitation options.
Finally, minimizing disturbances is crucial. Areas with less human traffic increase bird confidence. Quiet locations lead to higher feeding success.
In summary, effective mounting locations consider natural shelter, height, proximity to water, environmental factors, and disturbance levels. These factors combined create an inviting space for birds.
What Environmental Factors Should Influence My Camera Bird Feeder Placement?
The placement of a camera bird feeder should be influenced by various environmental factors to attract birds effectively and provide optimal viewing conditions.
-
- Sunlight exposure
-
- Wind direction
-
- Proximity to shelter
-
- Accessibility to food sources
-
- Predation risk
-
- Height of placement
-
- Viewing distance from your home
Considering these points will help ensure that the camera bird feeder is positioned effectively for birdwatching and enjoyment.
-
Sunlight Exposure: Sunlight exposure affects visibility and bird activity. Morning sun may attract more birds as they seek warmth and visibility. The ideal placement encourages natural light without creating glare on the camera lens.
-
Wind Direction: Wind direction influences where birds prefer to feed. Birds often seek sheltered spots to avoid strong winds. Placing a feeder in a location protected from prevailing winds can attract more species.
-
Proximity to Shelter: Proximity to trees, bushes, or other cover offers safety from predators. Birds feel more secure feeding close to these natural shelters. This increases feeding frequency and provides better camera opportunities.
-
Accessibility to Food Sources: Placing feeders near natural food sources, like berry bushes or seeds, increases visits. Birds are instinctively drawn to areas where they find food naturally, resulting in more frequent visits to your feeder.
-
Predation Risk: The risk from predators, such as cats or hawks, can deter birds. Choosing a location that minimizes predation risk helps ensure that birds feel safe while feeding. Elevated placements may offer better safety.
-
Height of Placement: The height of your camera bird feeder affects the types of birds that visit. Most birds favor feeders from 5 to 10 feet off the ground. The height also helps in viewing the birds without obstruction.
-
Viewing Distance from Your Home: The distance from your viewing point to the feeder matters for enjoyment and use of the camera. A placement that balances visibility and privacy encourages birds to feed while allowing for unobtrusive observation.
Using these guidelines improves the chances of attracting a diverse range of bird species while ensuring enjoyable viewing experiences with your camera bird feeder.
How Do Surroundings Impact Bird Visibility and Safety?
Surroundings significantly impact bird visibility and safety through factors like habitat structure, light conditions, predator presence, and human activity. These aspects directly influence how well birds can see their environment, find food, and avoid threats.
Habitat structure: Dense vegetation provides birds with cover from predators. According to a study by Saracco et al. (2018), habitats with diverse plant life enhance bird visibility and safety. Birds can easily navigate and spy predators from foliage cover.
Light conditions: Bright sunlight can create glare that hampers a bird’s visibility. Research by Stuber et al. (2019) indicates that lower light levels in shaded areas allow birds to spot predators more efficiently. In contrast, open areas expose birds to vision challenges and threats.
Predator presence: The type and number of predators in an area affect bird safety. A study by Cresswell (1999) noted that birds in environments with fewer predators display higher visibility and increased foraging behavior. This leads to better food availability and survival.
Human activity: Urbanization and human disturbances can negatively affect bird visibility and safety. A report from the Journal of Avian Biology (Møller, 2010) highlights that noise and visual pollution can disorient birds, making it harder for them to find food and evade threats.
These factors combined illustrate how surroundings directly influence bird behaviors and overall well-being.
Which Natural Habitats Are Best for Attracting Birds?
Natural habitats that are best for attracting birds include:
- Wetlands
- Forests
- Grasslands
- Urban Gardens
- Coastal Areas
Natural habitats that attract birds often vary by species, seasonal changes, and environmental conditions. Some may prefer dense forests while others favor open fields. However, conflicting opinions exist regarding the impact of urban environments on bird populations.
-
Wetlands:
Wetlands serve as crucial habitats for many bird species. Wetlands are areas where water exists close to the surface of the soil, making them rich in biodiversity. According to the U.S. Fish and Wildlife Service, around 30% of North American birds rely on wetlands for nesting and foraging. Migratory birds, such as ducks and shorebirds, depend on these areas during their journeys. Research by the National Audubon Society indicates that protecting wetlands can enhance local bird populations significantly. -
Forests:
Forests are essential habitats for countless birds. Forests consist of dense trees and vegetation, providing cover and nesting sites. A study published in the journal “Ecological Applications” highlights that forest bird diversity increases with tree age and species variety. Birds like woodpeckers and warblers thrive in these environments. Forest management practices that prioritize native species rehabilitation positively influence bird abundance. -
Grasslands:
Grasslands play a vital role in supporting ground-nesting birds. Grasslands are characterized by open spaces filled with grasses, minimal tree cover, and rich soil. According to the Grassland Birds Initiative, species such as the Bobolink and Eastern Meadowlark depend on these habitats for breeding. The decline of grasslands due to agriculture and urban development poses a threat to these bird populations. -
Urban Gardens:
Urban gardens can surprisingly attract a variety of bird species. Urban gardens provide food sources, like seeds and fruits, and shelter in densely populated areas. Research by the Royal Society for the Protection of Birds shows that well-maintained gardens can increase local bird species diversity. Installing bird feeders and native plants can significantly enhance the appeal of these environments for birds. -
Coastal Areas:
Coastal areas offer unique habitats for migratory and resident birds. Coastal regions consist of shorelines, marshes, and sandy dunes, which are critical for feeding and nesting. A study from the journal “Biological Conservation” emphasizes that protecting coastal ecosystems is crucial for bird conservation, particularly for shorebirds that migrate long distances. Coastal areas’ dynamic environments provide necessary resources for various avian species.
What Direction is Optimal for Mounting My Camera Bird Feeder?
The optimal direction for mounting your camera bird feeder is facing east or southeast. This orientation allows birds to benefit from morning sunlight, which helps attract them while providing good visibility for your camera.
-
Suggested Mounting Directions:
– East
– Southeast
– South
– West
– North -
Conflicting Perspectives:
– Some prefer north to reduce glare and heat.
– Others argue west offers better visibility during late afternoons.
– A few suggest varied angles based on specific bird species.
The choice of direction can influence bird activity and visibility.
Suggested Mounting Directions:
Facing the east or southeast optimally positions the bird feeder. These directions catch the morning light, enticing birds to visit. Research indicates that many birds prefer to feed when sunlight is available. According to the Cornell Lab of Ornithology, exposure to sunlight can increase activity levels among birds, enhancing your chances of capturing footage.
Conflicting Perspectives:
Some birdwatchers prefer to mount feeders facing north. This direction can minimize glare from sunlight, especially during the brightest part of the day. While this can be beneficial, it may also reduce overall bird activity. Conversely, mounting in a western direction can increase visibility later in the day. This allows late-afternoon light to attract more birds. However, this may not be ideal in hot climates, where afternoon sun can deter feeding. Preferences may vary depending on local bird species and their habits, requiring custom adjustments.
Ultimately, the best direction may depend on your environment and specific bird encounters.
How Does Sunlight and Shade Affect Camera Footage Quality?
Sunlight and shade significantly affect camera footage quality. Bright sunlight can create overexposed images. This happens because too much light enters the camera, washing out details. Conversely, shade can lead to underexposed images. In shaded areas, insufficient light can cause dark and unclear footage.
Cameras rely on light to capture clear images. Sunlight provides abundant illumination, enhancing color vibrancy. It also increases clarity and detail in footage. On sunny days, colors appear more saturated. However, harsh shadows can obscure details and create uneven lighting.
In shaded conditions, the absence of direct sunlight requires the camera to rely on ambient light. This may lead to graininess or noise in the footage. Higher ISO settings help in low-light situations but can reduce image quality. Soft diffused light in shade can create a more balanced exposure, but it may lack the sharpness found in well-lit scenes.
Adjusting camera settings can help mitigate these effects. Using exposure compensation can reduce the brightness in sunny conditions. Lowering ISO can improve quality in shaded areas. Taking time to consider time of day and direction of sunlight while filming greatly impacts overall footage quality.
What Are the Advantages of Facing the Feeder Towards Specific Landmarks?
The advantages of facing the feeder towards specific landmarks include improved visibility for birds, easier monitoring for observers, and enhanced aesthetic appeal in the environment.
- Improved visibility for birds
- Easier monitoring for observers
- Enhanced aesthetic appeal
- Increased species variety
- Better positioning for light and shadow effects
Focusing on these advantages presents a comprehensive view of the topic.
-
Improved visibility for birds: When feeders face landmarks such as trees or buildings, they provide birds with a recognizable reference point. Recognizable landmarks assist birds in locating food sources more quickly and reduce their anxiety by offering safe perches. Many birdwatchers have observed that positioning feeders near natural features can increase the number of visits from species like finches and sparrows due to the lower risk perceived by the birds.
-
Easier monitoring for observers: Positioning feeders towards landmarks makes observation easier for birdwatchers and researchers. It allows them to spot birds and record behavior without disturbing their feeding. A study by the Cornell Lab of Ornithology highlights that feeders placed near distinct landmarks increase the likelihood of documenting avian activity, thus resulting in better data collection.
-
Enhanced aesthetic appeal: Attractive landmarks contribute to the visual enjoyment of a bird feeder setup. Landscaping elements, such as flower gardens or rock formations, can complement feeder placements. This aesthetic enhancement can encourage people to spend more time observing nature and can even be beneficial for mental well-being.
-
Increased species variety: Feeders facing landmarks can attract a diverse range of bird species. Landmarks such as water features or dense shrubbery provide nesting and foraging opportunities. The National Audubon Society emphasizes that varied visual stimuli can create a more engaging feeding environment.
-
Better positioning for light and shadow effects: Proper orientation towards landmarks can optimize natural light conditions. Ideally situated feeders benefit from morning sunlight while providing shade during the hottest parts of the day. This has been supported by observations from avid birders who note that light conditions impact feeding patterns and bird visibility.
These specific advantages highlight the practical and aesthetic benefits of properly orienting bird feeders towards distinct landmarks.
What Safety Considerations Should I Keep in Mind When Installing a Camera Bird Feeder?
To ensure safety when installing a camera bird feeder, consider the following safety factors.
- Location to avoid hazards
- Stability of the mounting system
- Weatherproofing decisions
- Wildlife interaction protocols
- Power source management
- Camera accessibility for maintenance
- Local regulations compliance
Considering these factors enhances the safety and functionality of your installation while addressing diverse perspectives on wildlife interaction and equipment use.
-
Location to Avoid Hazards: Selecting the right location is crucial. Avoid areas near power lines, busy roads, and dense vegetation where predators may lurk. This helps prevent potential accidents or disturbances to the birds.
-
Stability of the Mounting System: Ensure the feeder is securely anchored. Use sturdy mounting brackets and inspect the stability regularly to withstand weather elements and potential animal interference. A firm installation reduces the risk of the feeder falling and causing injury.
-
Weatherproofing Decisions: Opt for weather-resistant materials for the feeder and camera. Ensuring the camera is well-protected from rain, snow, and extreme temperatures is essential. Waterproof casings can enhance durability and functionality.
-
Wildlife Interaction Protocols: Understand local wildlife behavior. Birds may attract unwanted animals such as raccoons or squirrels, posing risks to both the feeder and the wildlife. Setting guidelines on managing feeder access can help avoid challenging confrontations.
-
Power Source Management: If using electric components, focus on the safe installation of wires and outlets. Avoid overloading circuits and ensure all wiring is out of reach of rain and wildlife. Regular inspection helps identify wear and prevent electrical hazards.
-
Camera Accessibility for Maintenance: Install the camera in a way that allows easy access for cleaning and repositioning, if necessary. This maintenance is vital for optimal performance and longevity of the equipment.
-
Local Regulations Compliance: Familiarize yourself with local laws regarding wildlife feeding and camera installations. Compliance ensures that you’re not violating wildlife protection statutes and avoids potential fines.
These aspects contribute significantly to the safety and effectiveness of your camera bird feeder installation.
How Can I Protect Birds from Predators While Using a Camera?
To protect birds from predators while using a camera, employ strategic placement and protective measures. These practices include using elevated mounts, selecting camera types wisely, and maintaining a safe environment.
-
Elevated Mounts: Place cameras on elevated poles or trees. This height helps deter ground predators such as cats and raccoons. Research by Caro (2005) indicates that many predators prefer to operate at ground level.
-
Camera Type Selection: Choose cameras with motion detection features. Cameras with rapid response times can capture bird activities quickly and alert you to potential threats. A study by DeVault et al. (2003) highlights that timely detection is critical for bird safety.
-
Clear Surroundings: Ensure the area around the camera is free from vegetation or debris that can provide hiding spots for predators. Maintaining a clear zone reduces ambush risks. According to research by Sutherland (2000), visibility is crucial for both birds and their potential predators.
-
Fake Predators: Consider using decoys of predatory birds, such as hawks, to scare off real ones. This method can be effective in deterring other predators, as suggested in studies on territorial behaviors (Baker, 2010).
-
Feeding Strategies: Use bird feeders that are designed to be predator-proof. Some feeders have features that prevent access by larger predators. Data from the National Audubon Society (2021) shows that protective feeders can significantly reduce predation events.
-
Monitoring and Adjustments: Regularly monitor the area and adjust camera positions as needed. Predatory behavior can change over time, so staying vigilant is important. Observational data from ornithological studies indicate that changes in local predator populations can impact bird safety.
-
Bird-Friendly Landscaping: Incorporate native plants that provide shelter. Dense shrubs can offer hiding spots for birds, while also making it harder for predators to approach unnoticed. Research suggests that habitat complexity is beneficial for bird security (Fletcher, 2016).
Implementing these strategies can significantly reduce the risk of predation for birds while using a camera.
What Measures Ensure the Feeder Stays Secure in Various Weather Conditions?
To ensure a feeder remains secure in various weather conditions, several measures can be implemented.
- Weight and Stability
- Anchoring Systems
- Material Durability
- Design Features
- Location Considerations
Implementing these measures can safeguard the feeder against harsh environmental elements.
-
Weight and Stability: Ensuring that the feeder has enough weight and stability prevents it from being easily toppled by wind or rain. A heavier base reduces the risk of tipping over during storms. For example, feeders with a solid, wide base are less likely to blow over than those that are lightweight.
-
Anchoring Systems: Utilizing anchoring systems, such as stakes or tie-downs, secures the feeder to the ground. Ground stakes, for instance, can help steady bird feeders during high winds. The National Audubon Society recommends securing feeders in areas prone to strong winds, improving their resilience.
-
Material Durability: Selecting materials that withstand extreme weather conditions enhances feeder longevity. For instance, metal or composite materials resist corrosion and rotting better than wood. According to a 2021 study from the University of Minnesota, feeders made from recycled plastics demonstrated greater durability and weather resistance compared to traditional wood feeders.
-
Design Features: Certain design features can add to a feeder’s resilience. Features such as ventilation and drainage prevent water accumulation, minimizing mold risks. Additionally, feeders designed with flexible components can reduce the impact of strong winds. A feeder with a rounded shape, for example, tends to withstand wind better than one with sharp corners that can catch the wind.
-
Location Considerations: Placing the feeder in a sheltered location can provide natural protection from the elements. Positioning feeders near trees or buildings can shield them from wind and heavy rainfall. The American Bird Conservancy suggests that feeders situated in locations that minimize exposure to harsh weather can significantly extend their usability and security.
These measures collectively enhance the feeder’s ability to remain secure in various weather conditions.
What Common Mistakes Should I Avoid When Mounting a Camera Bird Feeder?
To effectively mount a camera bird feeder, avoid common mistakes such as poor location selection, inadequate stability, and lack of maintenance.
- Poor Location Selection
- Inadequate Stability
- Improper Height
- Not Considering Sunlight
- Failing to Camouflage
- Neglecting Accessibility
Addressing these points properly can enhance your bird-watching experience and increase the effectiveness of your feeder.
-
Poor Location Selection: Poor location selection refers to choosing a spot that does not attract birds. Birds tend to favor areas with natural cover for protection and easy access to food. A study by the Cornell Lab of Ornithology highlights that placing feeders near trees or shrubs can increase bird visits by up to 50%. If the feeder is in an open area, birds may avoid it due to the lack of safety from predators.
-
Inadequate Stability: Inadequate stability occurs when the feeder is not securely mounted, leading to movement or tipping. A stable platform ensures that food remains accessible and avoids spillage. According to a survey by the National Audubon Society, feeders with sturdy supports attract more birds. Using brackets or screws can help provide additional stability.
-
Improper Height: Improper height involves mounting the feeder too high or too low, which can deter bird access. Different bird species prefer different heights. For example, small birds often prefer heights around 5 to 7 feet, while larger birds may be more comfortable at 10 feet. Ensuring the right height is essential in fostering an environment that welcomes diverse avian species.
-
Not Considering Sunlight: Not considering sunlight can lead to overheating of food or an uncomfortable feeding environment for birds. In hot weather, direct sunlight can spoil seed quickly and deter birds. The American Bird Conservancy recommends placing feeders in partially shaded areas to maintain optimal seed quality and bird comfort, particularly in summer months.
-
Failing to Camouflage: Failing to camouflage the feeder can make it overly obvious and uninviting to birds. Using natural colors or materials that blend with the surroundings can make the feeder more appealing. A study by Audubon suggests that feeders designed to mimic the surrounding environment receive more visits from elusive birds.
-
Neglecting Accessibility: Neglecting accessibility refers to difficulties in refilling or cleaning the feeder due to its location. A feeder that is hard to reach can become neglected and dirty. Regular cleaning is vital to prevent disease among visiting birds. Placing feeders within an arm’s reach can promote proper maintenance and ensure long-term use.
How Can Improper Placement Lead to Poor Footage and Bird Visits?
Improper placement of a bird feeder can significantly reduce the quality of footage captured and the frequency of bird visits. Key factors affecting these outcomes include visibility, safety, accessibility, and environmental factors.
-
Visibility: A bird feeder that is not placed in a clear line of sight for birds may go unnoticed. According to a study by Stansell et al. (2019), birds prefer feeders positioned in open areas where they can easily spot potential food sources.
-
Safety: Birds seek safe feeding environments to protect themselves from predators. If a feeder is too exposed or close to hiding spots for predators, birds may avoid it altogether. Research by Baker and Whelan (2017) indicates that feeders located near dense vegetation can deter birds due to increased perceived risk.
-
Accessibility: Feeders positioned too high or too low can hinder bird access. A study by Whelan et al. (2020) found that correct height placements increase the likelihood of bird visits. Feeders should be between 5 to 6 feet high to cater to a wide range of bird species.
-
Environmental factors: Weather conditions can also impact feeding behavior. Feeders placed in areas with strong winds or direct sunlight can deter birds. For example, a study by Kelsey et al. (2021) demonstrated that birds prefer feeders with some shelter from harsh weather, enhancing their comfort while feeding.
Understanding these factors can help improve both bird activity around feeders and the quality of footage captured during birdwatching sessions.
What Are Some Tips for Regular Maintenance and Adjustments?
Regular maintenance and adjustments ensure that equipment operates efficiently and safely. Steps for effective maintenance vary according to type and function.
- Check and clean equipment regularly
- Lubricate moving parts
- Inspect for wear and tear
- Adjust settings for optimal performance
- Ensure safety features are functional
- Replace worn or damaged parts
- Document maintenance activities
Understanding the various aspects of maintenance will provide a comprehensive approach to keeping equipment in top condition.
-
Checking and Cleaning Equipment Regularly:
Checking and cleaning equipment regularly involves visual inspections and physical cleaning to remove dust, grime, or debris. Regular maintenance significantly increases the lifespan of any equipment. For instance, according to the Equipment Maintenance Association (2022), routine cleaning can enhance equipment lifespan by up to 30%. Practical examples include using compressed air to clear out debris from machine parts or wiping down control panels to ensure clear visibility. -
Lubricating Moving Parts:
Lubricating moving parts minimizes friction and wear, which can cause early deterioration. Proper lubrication provides a smooth operation and reduces the risk of breakdowns. The AFPM states that lubrication can reduce failure rates of equipment by 70%. A case study by National Institute of Standards and Technology (2019) found that equipment that received regular lubrication demonstrated nearly double the lifespan compared to unlubricated equipment. -
Inspecting for Wear and Tear:
Inspecting equipment for wear and tear highlights any parts that may need repair or replacement before they cause major issues. Maintenance records indicate that early detection of wear can prevent catastrophic failures. For example, a study by Engineered Systems (2020) identified that early inspection and replacement of worn belts in HVAC systems saved facilities an average of 25% in repair costs. -
Adjusting Settings for Optimal Performance:
Adjusting settings ensures that machinery operates under ideal conditions, allowing for efficient energy use and productivity. For example, a manufacturing company reported a 15% reduction in energy costs after optimizing machine settings following thorough evaluations (Smith et al., 2021). Monitoring energy consumption and performance metrics helps identify necessary adjustments based on production needs. -
Ensuring Safety Features are Functional:
Ensuring safety features are functional is crucial for preventing accidents and injuries. This includes checking emergency stops, alarms, and automatic shut-offs. The Occupational Safety and Health Administration (OSHA) mandates regular safety checks in workplace environments. A report from the National Safety Council (2021) indicates that equipment with properly functioning safety features reduces workplace accidents by 30%. -
Replacing Worn or Damaged Parts:
Replacing worn or damaged parts proactively prevents equipment failure and promotes safe operation. Keeping a stock of commonly needed parts can streamline this process. According to a reliability engineering study by the University of Maryland (2020), timely replacement of critical components can enhance operational efficiency by up to 40%. -
Documenting Maintenance Activities:
Documenting maintenance activities creates a record for future reference and enhances accountability. It aids in compliance with regulations as well as identifying patterns or recurring issues. Studies indicate that organizations maintaining comprehensive logs achieve a 20% increase in maintenance efficiency (Maintenance Review, 2021). Creating digital records can also facilitate easier access and analysis of maintenance data over time.